[ WSL ] Ubuntu 24.04 Jazzy ROS2
[ jetson ] Jetson nano Foxy ROS2
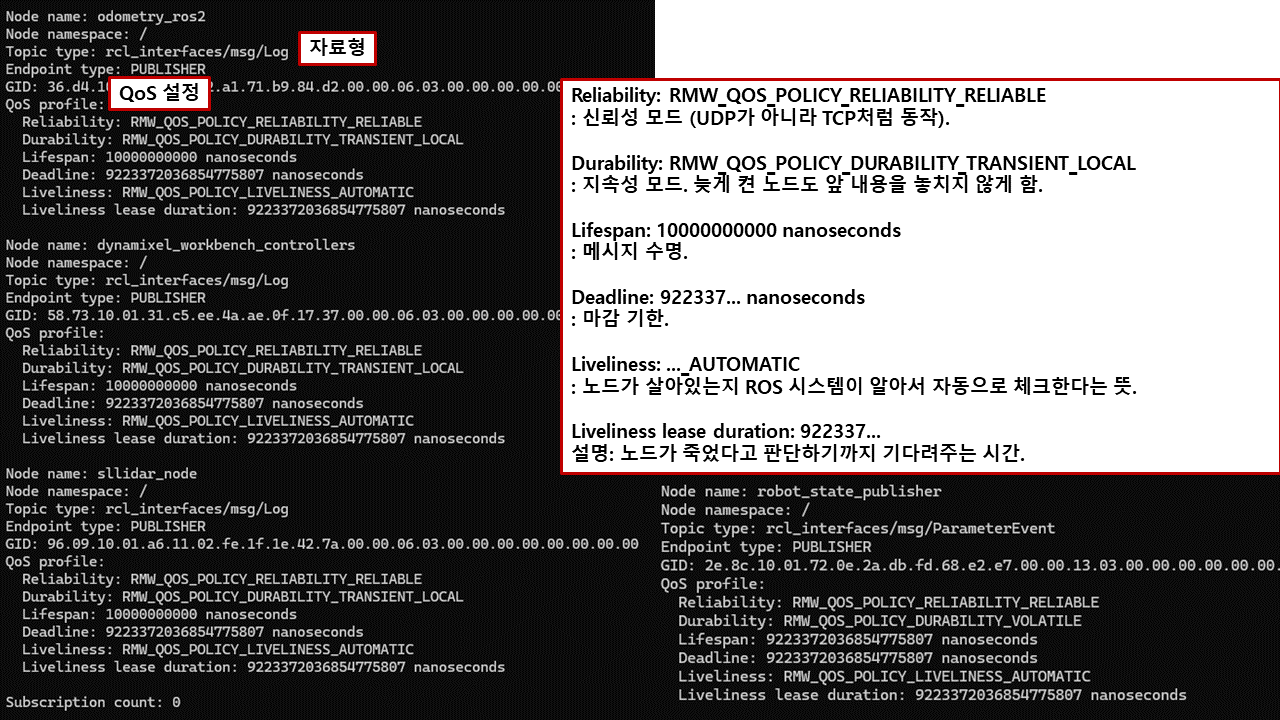
(1) 젯슨보드에서 실행되는 다음 노드들의 topic list, info, hz, bw, echo를 모두 조사하시오.
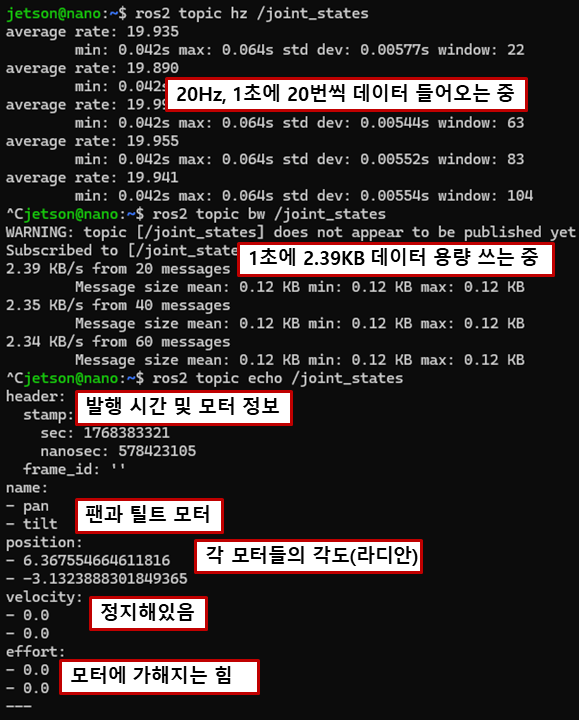
dynamixel_workbench_controllers
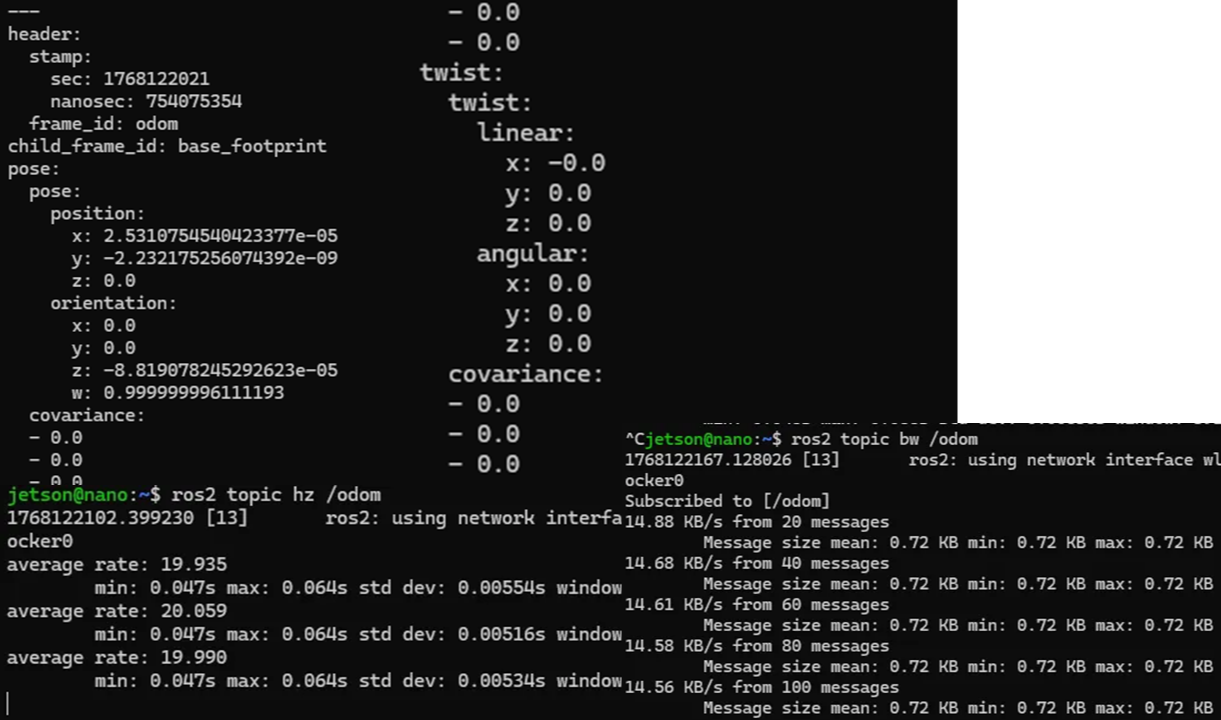
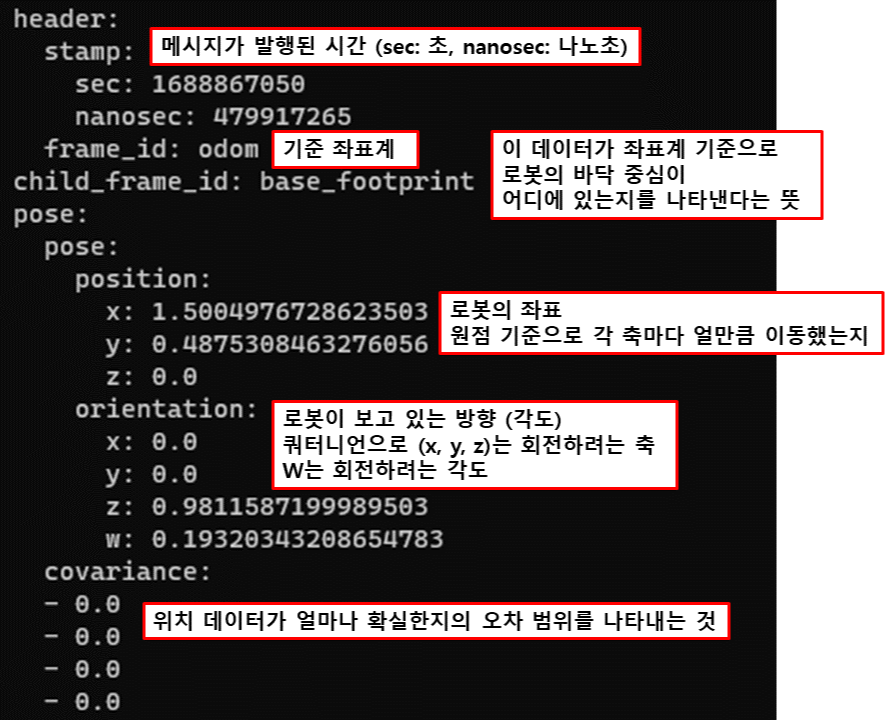
odometry_ros2
robot_state_publisher
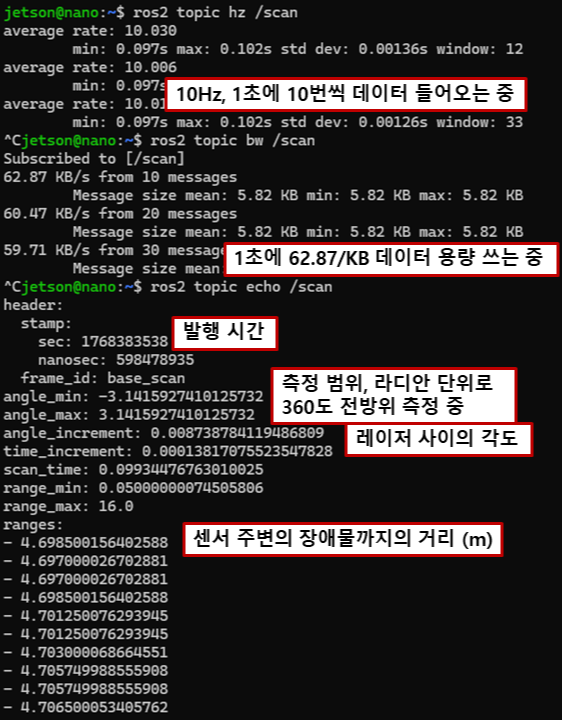
rplidar_scan_publisher
info
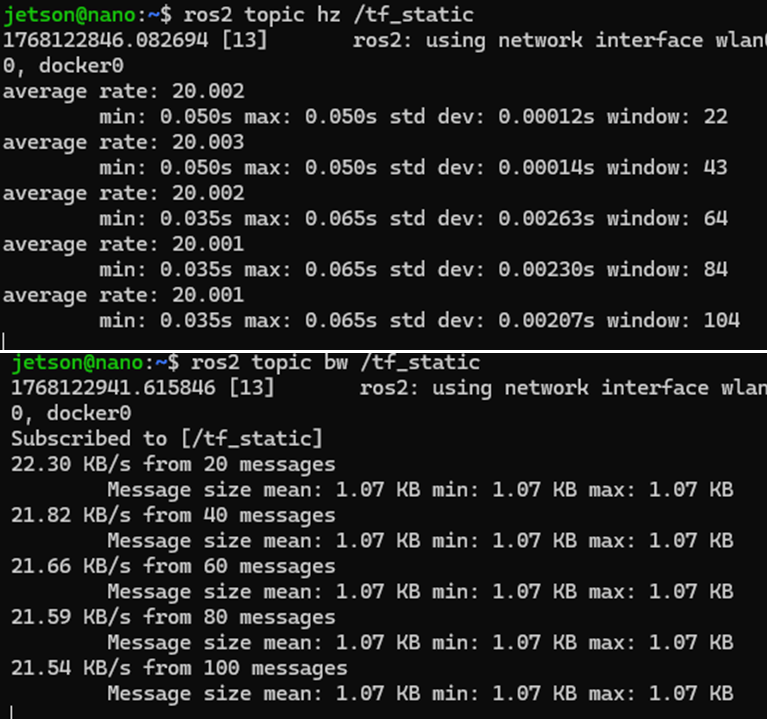
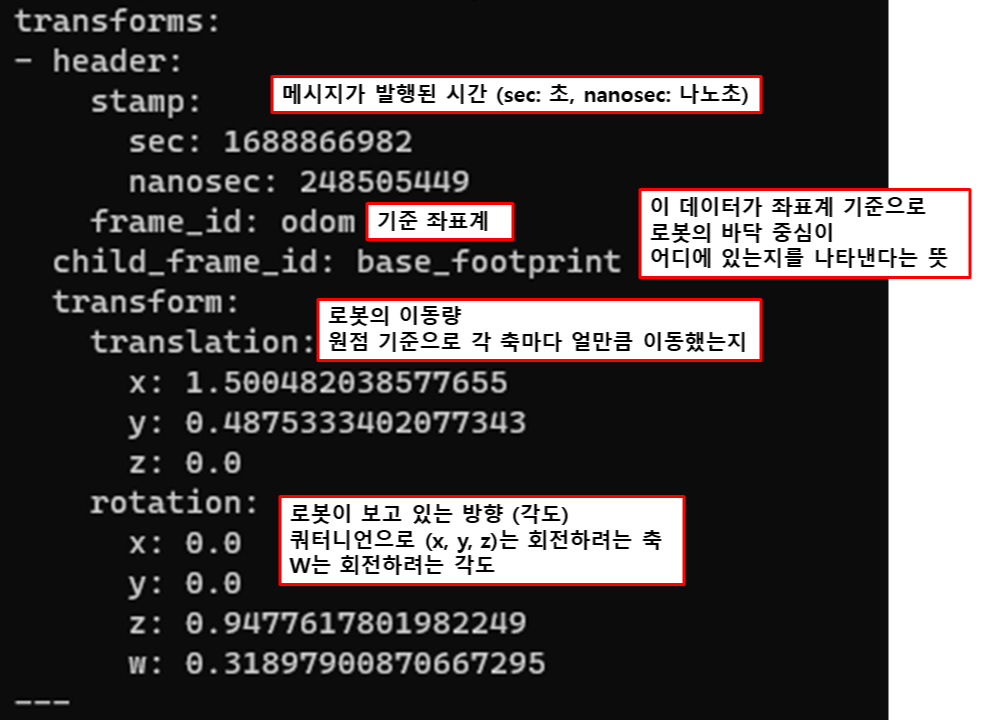
dynamixel_workbench_controllers의 hz, bw, echo
odometry_ros2의 hz, bw, echo
robot_state_publisher의 hz, bw, echo
rplidar_scan_publisher의 hz, bw, echo
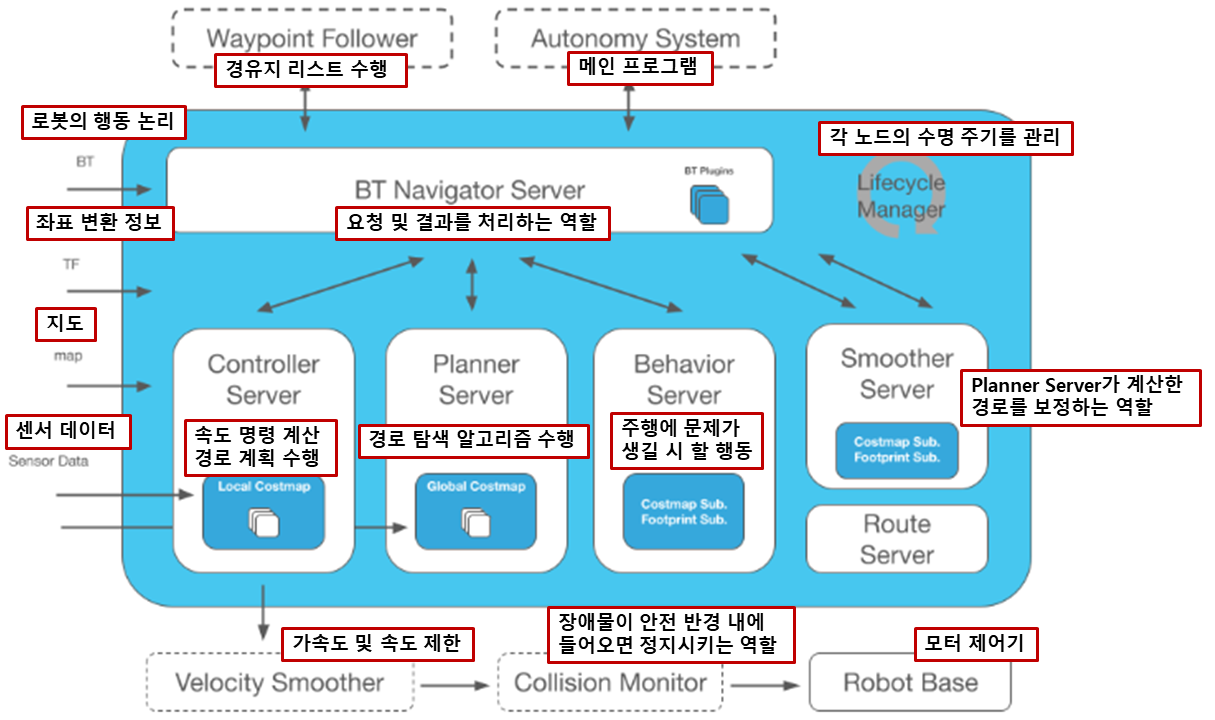
(2) nav2 패키지의 세부 알고리즘을 설명하라.
(3) turtlebot3_navigation2 패키지안에 있는 navigation2.launch.py 파일을 라인단위로 설명하라
navigation.launch.py
| # Copyright 2019 Open Source Robotics Foundation, Inc. # # Licensed under the Apache License, Version 2.0 (the "License"); # you may not use this file except in compliance with the License. # You may obtain a copy of the License at # # http://www.apache.org/licenses/LICENSE-2.0 # # Unless required by applicable law or agreed to in writing, software # distributed under the License is distributed on an "AS IS" BASIS, # WITHOUT WARRANTIES OR CONDITIONS OF ANY KIND, either express or implied. # See the License for the specific language governing permissions and # limitations under the License. # # Author: Darby Lim import os # 운영체제 경로 및 환경변수 사용을 위한 모듈 # ROS 2 패키지 경로를 찾기 위한 함수 임포트 from ament_index_python.packages import get_package_share_directory # 런치 파일 구성을 위한 필수 클래스들 임포트 from launch import LaunchDescription from launch.actions import DeclareLaunchArgument from launch.actions import IncludeLaunchDescription from launch.launch_description_sources import PythonLaunchDescriptionSource from launch.substitutions import LaunchConfiguration from launch_ros.actions import Node # 운영체제 환경변수에서 'TURTLEBOT3_MODEL' (burger, waffle, waffle_pi)을 가져옴 TURTLEBOT3_MODEL = os.environ['TURTLEBOT3_MODEL'] # 운영체제 환경변수에서 'ROS_DISTRO' (humble, foxy 등)를 가져옴 ROS_DISTRO = os.environ.get('ROS_DISTRO') def generate_launch_description(): # LaunchConfiguration 설정: 외부에서 인자로 받을 수 있는 변수 정의 # 'use_sim_time' 변수 정의 (기본값 false). 시뮬레이션(Gazebo) 사용 시 true로 설정해야 함. use_sim_time = LaunchConfiguration('use_sim_time', default='false') # 'map' 변수 정의. 기본값으로 turtlebot3_navigation2 패키지 내의 map/map.yaml 경로를 잡음. map_dir = LaunchConfiguration( 'map', default=os.path.join( get_package_share_directory('turtlebot3_navigation2'), 'map', 'map.yaml')) # 파라미터 파일 이름 생성 param_file_name = TURTLEBOT3_MODEL + '.yaml' # ROS 버전에 따른 파라미터 파일 경로 설정 if ROS_DISTRO == 'humble': param_dir = LaunchConfiguration( 'params_file', default=os.path.join( get_package_share_directory('turtlebot3_navigation2'), 'param', ROS_DISTRO, param_file_name)) else: param_dir = LaunchConfiguration( 'params_file', default=os.path.join( get_package_share_directory('turtlebot3_navigation2'), 'param', param_file_name)) # 실제 Nav2 기능을 실행할 'nav2_bringup' 패키지의 launch 폴더 경로를 찾음 nav2_launch_file_dir = os.path.join(get_package_share_directory('nav2_bringup'), 'launch') # RViz 설정 파일 경로를 찾음 (tb3_navigation2.rviz) rviz_config_dir = os.path.join( get_package_share_directory('turtlebot3_navigation2'), 'rviz', 'tb3_navigation2.rviz') # LaunchDescription 반환: 실제로 실행할 액션들의 리스트 return LaunchDescription([ # [인자 선언] 터미널에서 'map:=/my/map.yaml' 처럼 경로를 바꿀 수 있게 선언함 DeclareLaunchArgument( 'map', default_value=map_dir, description='Full path to map file to load'), # [인자 선언] 터미널에서 'params_file:=/my/param.yaml' 처럼 파라미터를 바꿀 수 있게 선언함 DeclareLaunchArgument( 'params_file', default_value=param_dir, description='Full path to param file to load'), # [인자 선언] 시뮬레이션 시간 사용 여부 인자 선언 DeclareLaunchArgument( 'use_sim_time', default_value='false', description='Use simulation (Gazebo) clock if true'), # [외부 런치 파일 포함]'nav2_bringup' 패키지의 'bringup_launch.py'를 실행함. # 이때 우리가 위에서 설정한 map, use_sim_time, params_file 정보를 넘겨줌. IncludeLaunchDescription( PythonLaunchDescriptionSource([nav2_launch_file_dir, '/bringup_launch.py']), launch_arguments={ 'map': map_dir, 'use_sim_time': use_sim_time, 'params_file': param_dir}.items(), ), # [노드 실행] 시각화 도구인 RViz2를 실행함. Node( package='rviz2', executable='rviz2', name='rviz2', # 위에서 찾은 .rviz 설정 파일을 로드해서 화면 구성을 불러옴 arguments=['-d', rviz_config_dir], # 시뮬레이션 시간 동기화 설정 parameters=[{'use_sim_time': use_sim_time}], output='screen'), ]) |
(5) 연구실 실내에서 내비게이션 실험을 수행하고 결과를 동영상으로 제출하라
(6) gazebo simulator를 이용하여 navigation 실험을 수행하라.
(7) nav2 패키지를 이용한 내비게이션 실습시 rviz2에서 수행한 로봇자세 초기값 설정 및
로봇의 목표자세 설정을 수행하는 패키지를 작성하여 내비게이션을 수행하라.
originpoint.cpp
| #include <memory> #include <chrono> #include "rclcpp/rclcpp.hpp" #include "geometry_msgs/msg/pose_stamped.hpp" #include "geometry_msgs/msg/pose_with_covariance_stamped.hpp" #include "tf2/LinearMath/Quaternion.h" // 쿼터니언 변환을 위한 헤더 파일 using namespace std::chrono_literals; class Nav2PosePublisher : public rclcpp::Node { // ROS2 노드를 상속받아 클래스를 만듦 public: Nav2PosePublisher() : Node("nav2_pose_select_node") { // 생성자에서 노드 이름을 설정 // Qos 설정 auto qos_profile = rclcpp::QoS(rclcpp::KeepLast(1)).reliable().transient_local(); init_pub_ = this->create_publisher<geometry_msgs::msg::PoseWithCovarianceStamped>("/initialpose", qos_profile); // 초기 위치를 발행할 퍼블리셔 goal_pub_ = this->create_publisher<geometry_msgs::msg::PoseStamped>("/goal_pose", qos_profile); // 목표 위치를 발행할 퍼블리셔 timer_ = this->create_wall_timer(1s, std::bind(&Nav2PosePublisher::publish_once, this)); } private: void publish_once() { // 한 번만 실행될 함수를 정의 timer_->cancel(); // 타이머를 취소해서 함수가 반복 실행되지 않게 함 // 초기 위치 메시지를 생성 auto init_msg = geometry_msgs::msg::PoseWithCovarianceStamped(); init_msg.header.frame_id = "map"; // 기준 좌표계를 맵으로 설정 init_msg.header.stamp = this->now(); // 현재 시간을 헤더에 입력 init_msg.pose.pose.position.x = 0.0; // x좌표를 0으로 설정 init_msg.pose.pose.position.y = 0.0; // y좌표를 0으로 설정 tf2::Quaternion q; // 쿼터니언 변수를 선언 q.setRPY(0, 0, M_PI); // 오일러 각을 쿼터니언으로 변환 init_msg.pose.pose.orientation.x = q.x(); // 쿼터니언 x 값 init_msg.pose.pose.orientation.y = q.y(); // 쿼터니언 y 값 init_msg.pose.pose.orientation.z = q.z(); // 쿼터니언 x 값 init_msg.pose.pose.orientation.w = q.w(); // 쿼터니언 w 값 init_msg.pose.covariance[0] = 0.25; // 불확실성 공분산 값을 넣음 init_msg.pose.covariance[7] = 0.25; init_msg.pose.covariance[35] = 0.06; init_pub_->publish(init_msg); RCLCPP_INFO(this->get_logger(), "Published Initial Pose"); // 로그 출력 // 목표 위치 메시지를 생성 auto goal_msg = geometry_msgs::msg::PoseStamped(); goal_msg.header.frame_id = "map"; goal_msg.header.stamp = this->now(); goal_msg.pose.position.x = 2.0; goal_msg.pose.position.y = 1.0; q.setRPY(0, 0, 1.57); // 90도 회전하도록 각도를 설정 goal_msg.pose.orientation.x = q.x(); goal_msg.pose.orientation.y = q.y(); goal_msg.pose.orientation.z = q.z(); goal_msg.pose.orientation.w = q.w(); goal_pub_->publish(goal_msg); RCLCPP_INFO(this->get_logger(), "Published Goal Pose"); // 로그 출력 } rclcpp::Publisher<geometry_msgs::msg::PoseWithCovarianceStamped>::SharedPtr init_pub_; // 초기 위치 퍼블리셔 변수 rclcpp::Publisher<geometry_msgs::msg::PoseStamped>::SharedPtr goal_pub_; // 목표 위치 퍼블리셔 변수 rclcpp::TimerBase::SharedPtr timer_; // 타이머 변수 }; int main(int argc, char **argv) { // 메인 함수 시작 rclcpp::init(argc, argv); // 초기화 auto node = std::make_shared<Nav2PosePublisher>(); // 작성한 노드 객체를 생성 rclcpp::spin(node); // 노드가 작동하도록 스핀 rclcpp::shutdown(); // 종료 return 0; } |
(8) nav2 패키지를 이용하여 경유점설정하고 따라가도록 제어하는 방법(waypoint following)을 조사,
경유점을 설정하여 연구실 내부를 순환하도록 주행하는 패키지를 작성하라.
Nav2의 Waypoint Follower 동작 원리
> Action Interface: nav2_msgs/action/FollowWaypoints 액션을 사용함
사용자가 좌표 리스트(Watpoint List)를 보내면 Waypoint Follower가 첫 번째 좌표를 MapsToPose로 보냄
로봇이 해당 좌표에 도착하면 다음 좌표를 수행하는 동작
이를 제어하는 방법으로는 3가지가 있음
1. Rviz2 GUI
> 코드 필요 없이 Rviz2 화면에서 Nav2 Goal을 선택해서 주행했던 방식
2. Python API (nav2_simple_commander)
> Python으로 navigation을 쉽게 짤 수 있도록 BasicNavigator 클래스를 제공함
https://index.ros.org/p/nav2_simple_commander/

3. C++ Action Client
> rclcpp_action::Client<nav2_msgs::action::FollowWaypoints>를 생성하여 서버와 통신하는 방식
== 다른 C++ 노드와 통합하기 유리함
waypoint_follower.cpp
| #include <memory> #include <vector> #include <iostream> #include <cmath> #include "rclcpp/rclcpp.hpp" #include "rclcpp_action/rclcpp_action.hpp" #include "geometry_msgs/msg/pose_stamped.hpp" #include "nav2_msgs/action/follow_waypoints.hpp" #include "tf2/LinearMath/Quaternion.h" class WaypointFollower : public rclcpp::Node { public: using FollowWaypoints = nav2_msgs::action::FollowWaypoints; using GoalHandleFollowWaypoints = rclcpp_action::ClientGoalHandle<FollowWaypoints>; WaypointFollower() : Node("lab_waypoint_follower") { this->client_ptr_ = rclcpp_action::create_client<FollowWaypoints>(this, "follow_waypoints"); } void send_waypoints() { if (!this->client_ptr_->wait_for_action_server(std::chrono::seconds(10))) { RCLCPP_ERROR(this->get_logger(), "Nav2 Action Server not found."); return; } auto goal_msg = FollowWaypoints::Goal(); std::vector<std::vector<double>> coords = { {-1.0035, -0.0055, -3.13}, // wp1: 왼쪽으로 이동 {-2.0186, -0.0124, -3.14}, // wp2 {-3.0097, -0.0313, 3.10}, // wp3 {-3.3849, -1.0206, -1.55}, // wp4: 아래로 회전 {-3.3422, -2.0358, -1.57}, // wp5 {-3.0171, -3.0345, -0.01}, // wp6: 오른쪽으로 회전 {-1.9916, -2.6405, -0.01}, // wp7 {-1.0289, -2.5122, 0.01}, // wp8 { 0.3734, -2.4988, 1.54}, // wp9: 위로 회전 { 0.3909, -1.0455, 1.55}, // wp10 { 0.0, 0.0, M_PI} // 최종 원점 복귀 }; for (const auto& coord : coords) { // 좌표 리스트 하나씩 꺼내면서 반복 geometry_msgs::msg::PoseStamped pose; // 자세 정보 담을 객체 pose.header.frame_id = "map"; // 맵 기준 pose.header.stamp = this->now(); pose.pose.position.x = coord[0]; // x값 pose.pose.position.y = coord[1]; // y값 // Yaw 값을 쿼터니언으로 변환하여 설정 tf2::Quaternion q; q.setRPY(0, 0, coord[2]); pose.pose.orientation.x = q.x(); pose.pose.orientation.y = q.y(); pose.pose.orientation.z = q.z(); pose.pose.orientation.w = q.w(); goal_msg.poses.push_back(pose); } RCLCPP_INFO(this->get_logger(), "총 %zu개의 경유점으로 순환 주행 시작", goal_msg.poses.size()); auto send_goal_options = rclcpp_action::Client<FollowWaypoints>::SendGoalOptions(); send_goal_options.result_callback = std::bind(&WaypointFollower::result_callback, this, std::placeholders::_1); this->client_ptr_->async_send_goal(goal_msg, send_goal_options); } private: rclcpp_action::Client<FollowWaypoints>::SharedPtr client_ptr_; void result_callback(const GoalHandleFollowWaypoints::WrappedResult & result) { if (result.code == rclcpp_action::ResultCode::SUCCEEDED) { RCLCPP_INFO(this->get_logger(), "원점에 도착함."); } else { RCLCPP_ERROR(this->get_logger(), "xxxxxxxx"); } } }; int main(int argc, char ** argv) { rclcpp::init(argc, argv); auto node = std::make_shared<WaypointFollower>(); node->send_waypoints(); rclcpp::spin(node); rclcpp::shutdown(); return 0; } // {x, y, yaw} 순서 /*std::vector<std::vector<double>> coords = { {-0.97897,-0.011672,0.2}, {-2.0403,-0.0063621,0.2}, {-3.3538,-0.020806,0.2}, {-3.3538, -1.9751,0.2}, {-3.0431,-3.0172,0.2}, {-1.0126,-2.5334,0.2}, {0.3854,-2.4459,0.2}, { 0.0, 0.0, 3.14} // 시작할 Pose에서 설정한 PI(3.14)와 동일하게 설정 };*/ /*std::vector<std::vector<double>> coords = { {-0.97897, -0.011672, M_PI}, // WP1: 계속 왼쪽으로 진행 {-2.0403, -0.006362, M_PI}, // WP2: 계속 왼쪽으로 진행 {-3.3538, -0.020806, -1.57}, // WP3: 아래로 꺾기 위해 방향 전환 {-3.3538, -1.9751, -1.8}, // WP4: 대각선 아래 진행 {-3.0431, -3.0172, 0.0}, // WP5: 오른쪽으로 진행 시작 {-1.0126, -2.5334, 0.0}, // WP6: 계속 오른쪽 진행 {0.3854, -2.4459, 1.57}, // WP7: 원점(위쪽)으로 가기 위해 방향 전환 {0.0, 0.0, M_PI} // WP8: 최종 원점 도착 및 시작 자세 유지 };*/ |
https://github.com/mxnseo/ROS2_WSL_jazzy.git

(7, 8) 실행 결과 영상