SmolVLM / Qwen2.5-VL Fine-Tuning
FineTuning 예제
FineTuning을 쉽게 할 수 있도록 툴을 만들어놓은 github를 발견해서 이를 이용하여
custom dataset과 LoRA로 FineTuning을 진행할 예정임.
https://github.com/2U1/Qwen-VL-Series-Finetune
https://github.com/2U1/SmolVLM-Finetune
Dataset format
https://kind-slip-86b.notion.site/Dataset-Format-3818a2c2bfdb8045a001dbbd37c06349?source=copy_link
Environment setup (conda)
이전에 사전학습된 모델을 추론할 때 env setup시 비슷한 라이브러리가 많았음
따라서 한 conda env 환경에 SmolVLM과 Qwen2.5-VL 둘 다 FineTuning 가능한 가상환경으로 수정함
Ubuntu 22.04 / CUDA 12.6
| $ mkdir fine-tune $ cd ~/fine-tune $ git clone https://github.com/2U1/SmolVLM-Finetune.git $ git clone https://github.com/2U1/Qwen-VL-Series-Finetune.git $ conda create -n finetune python=3.11 -y $ conda activate finetune # 시스템 의존성 설치 $ sudo apt-get install -y ffmpeg pkg-config # Cython 설치 $ pip install Cython $ sudo apt-get install -y \ libavformat-dev \ libavcodec-dev \ libavdevice-dev \ libavutil-dev \ libavfilter-dev \ libswscale-dev \ libswresample-dev $ pip install av --prefer-binary (이후 requirements.txt 설치할때 av관련 오류가 뜨는데 상관없음. 최신버전이 깔려서 requirement.txt하고 버전이 안 맞아서 뜨는 오류인데 파인튜닝할때 사용 x) $ cd ./Qwen-VL-Series-FineTune $ grep -v "^av==" requirements.txt > requirementsN.txt $ pip install -r requirementsN.txt --extra-index-url https://download.pytorch.org/whl/cu126 $ cd ../SmolVLM-Finetune $ grep -v "^av==" requirements.txt > requirementsN.txt $ pip install -r requirements.txt --extra-index-url https://download.pytorch.org/whl/cu126 $ pip install flash-attn --no-build-isolation $ pip install pillow-avif-plugin num2words $ pip install qwen-vl-utils $ pip install tensorboard |
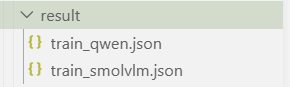
Dataset
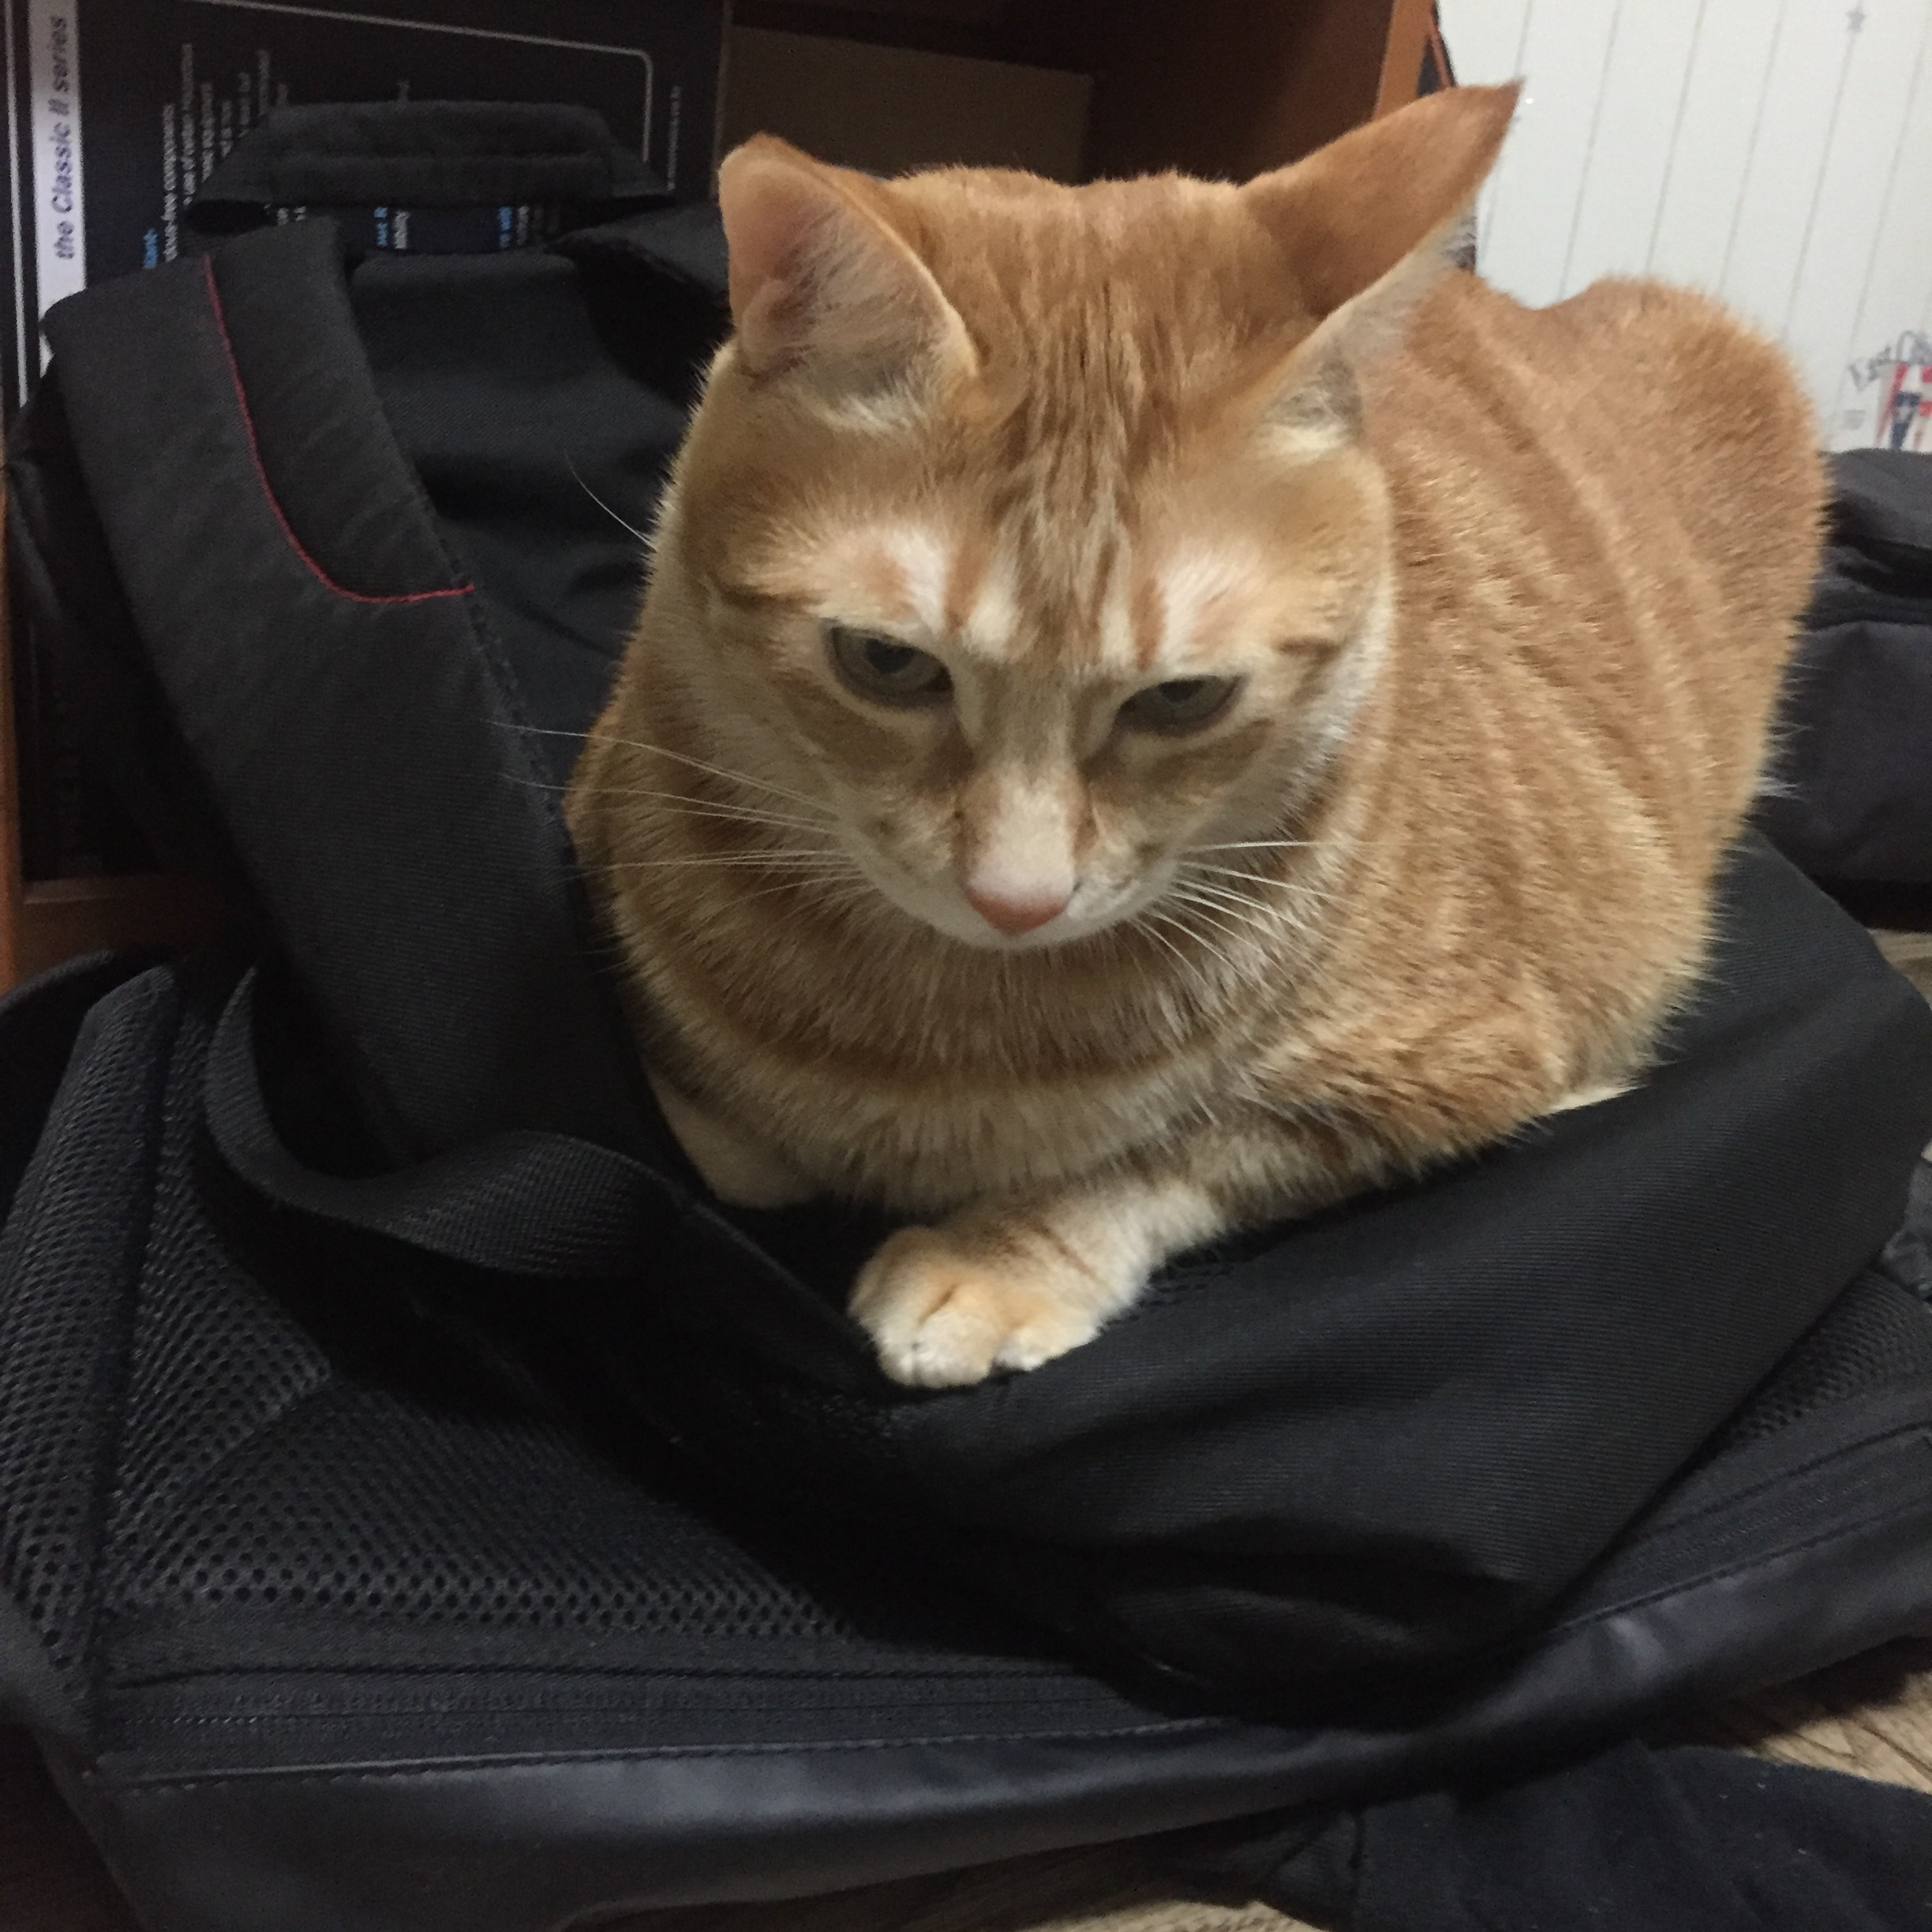
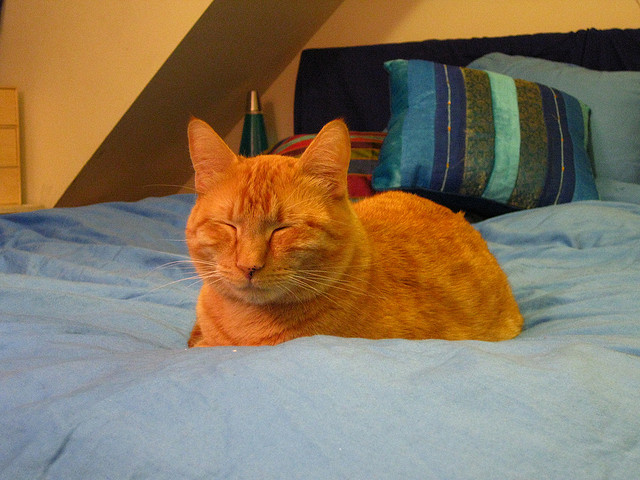
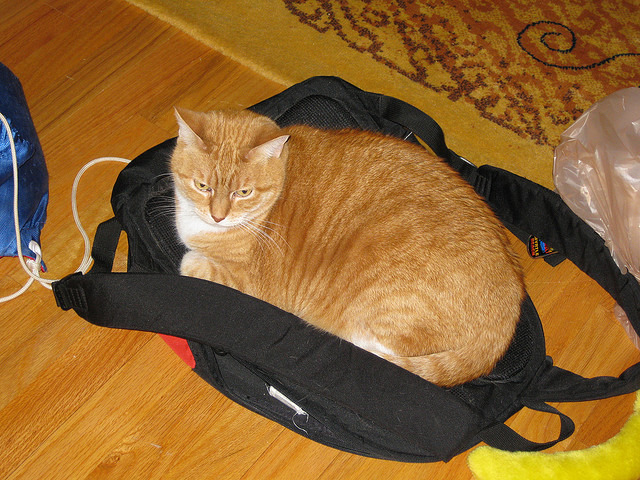
Image data는 우리집 고양이로 대체함.
LoRA 학습의 장점은 적은 데이터셋과 적은 VRAM 사용량이기 때문에 고양이 사진 35장을 준비함.
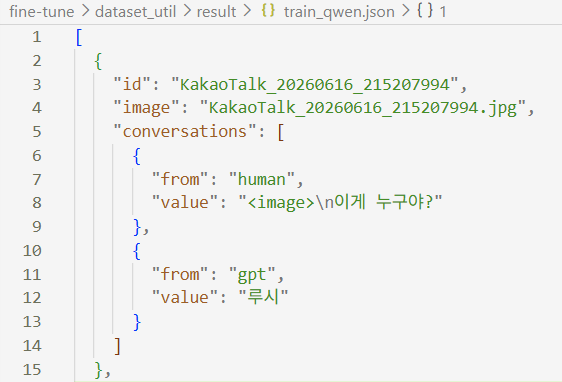
Qwen2.5-VL는 사전 학습된 모델이 한국어도 지원하기 때문에 .json 구성을 할 때 한국어로 question을 준비했고
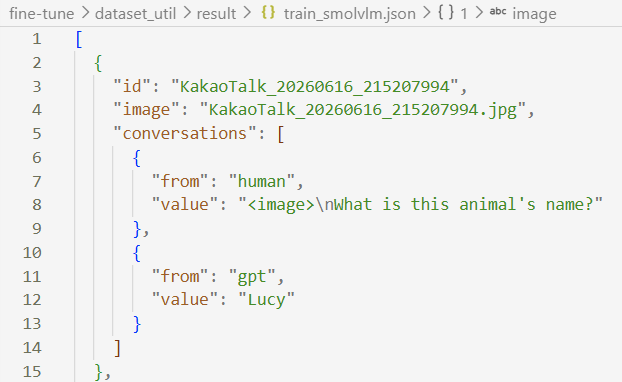
SmolVLM은 지원하지 않기 때문에 영어로 된 .json 파일을 구성하게 작성함.
코드 사용
| import os import json import random IMAGE_DIR = "./images" CONFIGS = { "qwen": { "output_json": "result/train_qwen.json", "answer": "루시", "questions": [ "이 동물 이름이 뭐야?", "사진 속 고양이는 누구야?", "이게 누구야?", ], }, "smolvlm": { "output_json": "result/train_smolvlm.json", "answer": "Lucy", "questions": [ "What is this animal's name?", "Who is this cat?", "What's this cat called?", ], }, } image_files = sorted( f for f in os.listdir(IMAGE_DIR) if f.lower().endswith((".jpg", ".jpeg", ".png")) ) random.seed(42) for model_name, cfg in CONFIGS.items(): data = [] for fname in image_files: question = random.choice(cfg["questions"]) data.append({ "id": os.path.splitext(fname)[0], "image": fname, "conversations": [ {"from": "human", "value": f"<image>\n{question}"}, {"from": "gpt", "value": cfg["answer"]} ] }) os.makedirs(os.path.dirname(cfg["output_json"]), exist_ok=True) with open(cfg["output_json"], "w", encoding="utf-8") as f: json.dump(data, f, ensure_ascii=False, indent=2) print(f"[{model_name}] {len(data)}개 샘플 생성 완료 → {cfg['output_json']}") |
사진을 준비하여 파일을 돌리면 아래와 같이 LLaVa 형식의 데이터셋 json file이 생성됨.

Script
github에서 .sh로 학습할 수 있도록 해놓음, 각 인자값들에 대한 설명은 아래 링크에 있음
https://github.com/2U1/Qwen-VL-Series-Finetune/blob/master/README.md#finetune-with-lora
기본적으로 sh가 전부 구성되어 있어서 원하는 학습을 진행하면 됨
finetune_lora.sh 수정
| #!/bin/bash # MODEL_NAME="Qwen/Qwen2-VL-7B-Instruct" # MODEL_NAME="Qwen/Qwen2-VL-2B-Instruct" MODEL_NAME="Qwen/Qwen2.5-VL-3B-Instruct" # MODEL_NAME="Qwen/Qwen2.5-VL-7B-Instruct" # MODEL_NAME="Qwen/Qwen3.5-4B" # MODEL_NAME="Qwen/Qwen3-VL-4B-Instruct" export PYTHONPATH=src:$PYTHONPATH # GLOBAL_BATCH_SIZE=128 # BATCH_PER_DEVICE=4 # NUM_DEVICES=8 GLOBAL_BATCH_SIZE=8 BATCH_PER_DEVICE=1 NUM_DEVICES=1 GRAD_ACCUM_STEPS=$((GLOBAL_BATCH_SIZE / (BATCH_PER_DEVICE * NUM_DEVICES))) # If you want to tune the `embed_token` with LoRA, You need to tune `lm_head` together # If you want to set the min pixels and max pixels for Qwen3-VL, You should set as (N * 32 * 32) # If you switch MODEL_NAME to a Qwen3.5 model, set `--disable_flash_attn2 True`. # Flash Attention 2 raised CUDA errors for the Qwen3.5 series in local tests, so SDPA is the stable path for now. deepspeed src/train/train_sft.py \ --use_liger_kernel True \ --lora_enable True \ --use_dora False \ --lora_namespan_exclude "['lm_head', 'embed_tokens']" \ --lora_rank 32 \ --lora_alpha 64 \ --lora_dropout 0.05 \ --num_lora_modules -1 \ # --deepspeed scripts/zero3_offload.json \ --deepspeed scripts/zero2.json \ --model_id $MODEL_NAME \ # --data_path /path/to/your/training/data.json \ # --image_folder /path/to/your/image/folder \ --data_path /home/airlab/fine-tune/dataset_util/result/train_qwen.json \ --image_folder /home/airlab/fine-tune/dataset_util/result/dataset/images \ --remove_unused_columns False \ # --freeze_vision_tower False \ --freeze_vision_tower True \ --freeze_llm True \ --freeze_merger False \ --bf16 True \ --fp16 False \ --disable_flash_attn2 False \ # --output_dir output/testing_lora \ --output_dir output/qwen25vl-lucy-lora \ # --num_train_epochs 1 \ --num_train_epochs 4 \ --per_device_train_batch_size $BATCH_PER_DEVICE \ --gradient_accumulation_steps $GRAD_ACCUM_STEPS \ # --image_min_pixels $((256 * 28 * 28)) \ # --image_max_pixels $((1280 * 28 * 28)) \ --image_min_pixels $((128 * 28 * 28)) \ --image_max_pixels $((512 * 28 * 28)) \ --learning_rate 1e-4 \ --merger_lr 1e-5 \ --vision_lr 2e-6 \ --weight_decay 0.1 \ --warmup_ratio 0.03 \ --lr_scheduler_type "cosine" \ --logging_steps 1 \ --tf32 True \ --gradient_checkpointing True \ --report_to tensorboard \ --lazy_preprocess True \ # --save_strategy "steps" \ --save_strategy "epoch" \ # --save_steps 200 \ # --save_total_limit 10 \ --save_total_limit 2 \ --dataloader_num_workers 4 |
바꾼 부분과 이유
- NUM_DEVICES 8 → 1, BATCH_PER_DEVICE 4 → 1: GPU 한 장이고 VRAM 12GB라 배치 줄임
- GLOBAL_BATCH_SIZE 128 → 8: 데이터가 35장뿐이라 큰 배치는 의미 없다고 함..
- zero3_offload.json → zero2.json: 원본 README에서도 zero2가 zero3보다 빠르고 안정적이라고 명시함.
ZeRO가 뭔지?: 메모리 최적화 기법 - freeze_vision_tower False → True: 원본은 vision tower까지 풀파인튜닝하는데,
단일 고양이 이름 외우기로 사용하기엔 그닥일 것 같아서 freeze함 - image_max_pixels 1280×28×28 → 512×28×28: 입력 이미지 해상도 토큰 수를 낮춰서 메모리 부담 줄임.
- num_train_epochs 1 → 4: 35장짜리 작은 데이터라 에폭을 늘렸음
- save_steps 200 → save_strategy "epoch": 에폭마다 저장하도록 변경
실제 실행할 땐 저렇게 공백이나 주석이 들어가면 오류가 날 수 있기 때문에 삭제하고 진행
현재 FineTuning은 Qwen2.5-VL로 진행함
| $ bash scripts/finetune_lora.sh |
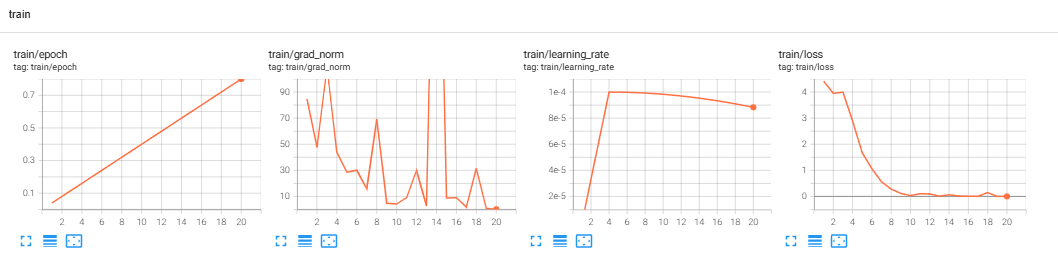
output
아래처럼 결과물이 나오게 됨
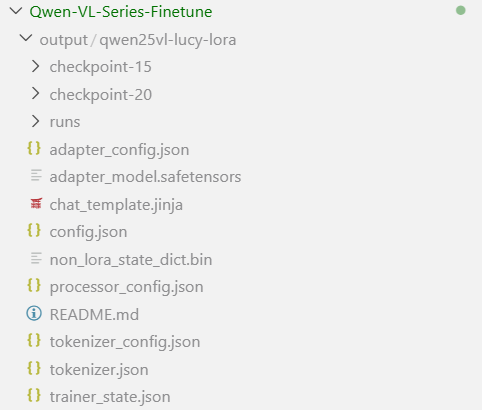
/runs 디렉터리 내에 tensorboard로 열 수 있는 파일들이 있어 tensorboard로 실시간 그래프 확인함
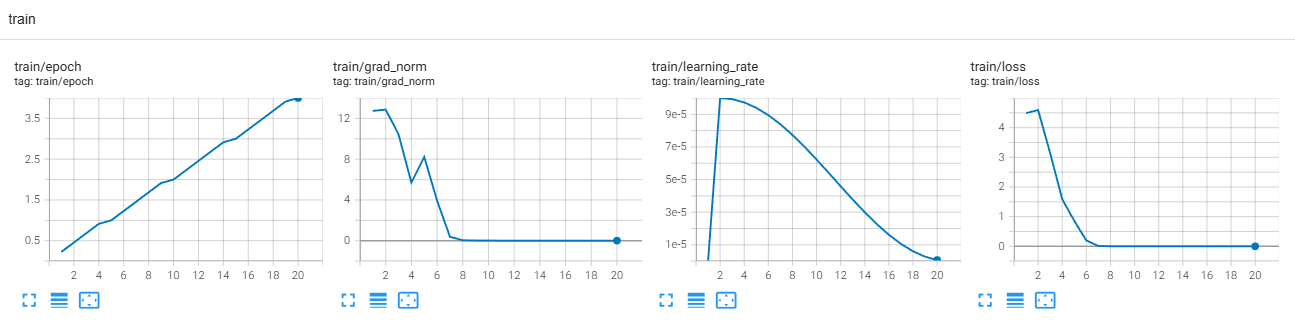
에퍽을 더 줄여도 loss가 잘 수렴할 것으로 보임

학습 시간은 총 1분 38초 걸림
결과 분석
학습 시 사용되지 않은 루시 사진으로 진행
inference code는 이전에 정리했던 코드를 사용함
model load만 수정하면 됨
| from peft import PeftModel BASE_MODEL = "Qwen/Qwen2.5-VL-3B-Instruct" LORA_PATH = "/home/airlab/fine-tune/Qwen-VL-Series-Finetune/output/qwen25vl-lucy-lora/checkpoint-20" processor = AutoProcessor.from_pretrained(LORA_PATH) base_model = Qwen2_5_VLForConditionalGeneration.from_pretrained( BASE_MODEL, torch_dtype=torch.bfloat16, device_map="auto" ) model = PeftModel.from_pretrained(base_model, LORA_PATH) |
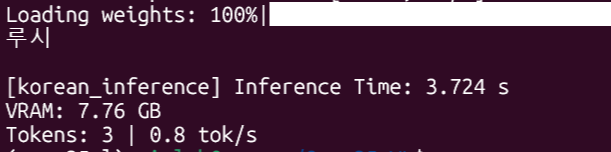
루시라고 옴, 학습되지 않은 질문에도 정확히 답변함
FineTuning 하기 전 model에서 똑같은 사진을 주고 같은 질문을 하게 되면 아래와 같이

루시라고 인지하지 못함, 엉뚱한 답변이 옴
문제점
고양이(루시가 아님)를 Test에 넣을 경우에도 루시라고 답변해버림
원인으로는 Vision model 쪽을 Freeze해서 정확도가 떨어지거나 에폭이 과해서 과적합 났을 경우,
아니면 nagative example이 없어서 고양이 = 루시로 학습되었을 수 있다고 판단함
따라서 Vision model의 freeze를 False로 두고 에퍽을 2로 줄여서 일단 학습 진행함
(nagative example은 수집하기에 시간이 더 걸릴 거 같아서 우선 할 수 있는 것으로 진행...)


학습은 총 3분 24초로 이전 훈련보다 길게 나온 것을 확인할 수 있음
Vision model 쪽을 freeze하지 않아서 더 길게 나온 것으로 유추함
결과적으로는 계속해서 루시라고 답했기 때문에 nagative example을 넣어야 정상적으로 동작할 것 같음
현재는 고양이의 이름 질문 = 루시 // 와 같은 형태로 학습했다고 판단함
다른 고양이들의 사진을 저장하고 dataset으로 활용하여 nagative example을 생성해서
보다 정확히 루시의 특징을 잡도록 진행함 (고양이 이름 = 루시 // 라는 흐름을 없애야 할 듯)
아래와 같이 코드를 수정해서 모르는 고양이(nagative example // 100장 | lucy = 100장) 예제 생성함
| import os import json import random IMAGE_DIR = "./images" LABEL_MAP = { "lucy": { "qwen": "루시", "smolvlm": "Lucy", }, "not_lucy": { "qwen": "모르는 고양이", "smolvlm": "Unknown cat", }, } CONFIGS = { "qwen": { "output_json": "result/train_qwen.json", "questions": [ "이 동물 이름이 뭐야?", "사진 속 고양이는 누구야?", "이게 누구야?", ], }, "smolvlm": { "output_json": "result/train_smolvlm.json", "questions": [ "What is this animal's name?", "Who is this cat?", "What's this cat called?", ], }, } def collect_images(base_dir): items = [] for folder in sorted(os.listdir(base_dir)): folder_path = os.path.join(base_dir, folder) if not os.path.isdir(folder_path) or folder not in LABEL_MAP: continue for fname in sorted(os.listdir(folder_path)): if fname.lower().endswith((".jpg", ".jpeg", ".png")): items.append((folder, fname)) return items image_items = collect_images(IMAGE_DIR) random.seed(42) for model_name, cfg in CONFIGS.items(): data = [] for folder, fname in image_items: question = random.choice(cfg["questions"]) answer = LABEL_MAP[folder][model_name] data.append({ "id": f"{folder}_{os.path.splitext(fname)[0]}", "image": f"{folder}/{fname}", "conversations": [ {"from": "human", "value": f"<image>\n{question}"}, {"from": "gpt", "value": answer} ] }) os.makedirs(os.path.dirname(cfg["output_json"]), exist_ok=True) with open(cfg["output_json"], "w", encoding="utf-8") as f: json.dump(data, f, ensure_ascii=False, indent=2) print(f"[{model_name}] {len(data)}개 샘플 생성 완료 → {cfg['output_json']}") |

총 훈련시간 약 12분
 |  |
두 고양이에 대해 모두 모르는 고양이라고 답함
변별력을 학습하려면 데이터셋 양도 class당 약 100장으로 늘리는게 좋고,
nagative한 예제를 넣어서 학습 흐름을 제어하는게 중요함