Adafruit사 SSD1306 라이브러리 핵심함수
- display.clearDisplay() – all pixels are off
- display.drawPixel(x,y, color) – plot a pixel in the x,y coordinates
- display.setTextSize(n) – set the font size, supports sizes from 1 to 8
- display.setCursor(x,y) – set the coordinates to start writing text
- display.print(“message”) – print the characters at location x,y
- display.display() – call this method for the changes to make effe
앞 게시판 샘플소스 코드 중 주요 라이브러리 설명 = 초기화 및 OLED 설정순서
1. OLED 객체선언
#include <Wire.h>
#include <Adafruit_GFX.h>
#include <Adafruit_SSD1306.h>
#define SCREEN_WIDTH 128 // OLED display width, in pixels
#define SCREEN_HEIGHT 64 // OLED display height, in pixels
// Declaration for an SSD1306 display connected to I2C (SDA, SCL pins) Adafruit_SSD1306 display(SCREEN_WIDTH, SCREEN_HEIGHT, &Wire, -1); // -1 은 리셋핀을 사용 안 할시 == 만약 리셋핀을 사용한다면 리셋핀 번호를 적어주면 됨
2. 초기화 == Ox3C는 OLED 어드레스임
if(!display.begin(SSD1306_SWITCHCAPVCC, 0x3C)) {
Serial.println("SSD1306 allocation failed");
for(;;); // Don't proceed, loop forever
}
3. 디스플레이 지우기
display.clearDisplay();
4. 글꼴크기 설정 == 1 ~ 8번가지 있음
display.setTextSize(1);
5. 글꼴색상 설정 = 기본 흰색글꼴과 검정색 배경
display.setTextColor(WHITE);
6. 글자표시 위치 지정
display.setCursor(0,10);
7. 글자표시 OLED Buffer로 보내기
display.println("Hello, world!");
8. 실제화면에 표시하기 = 최종 표시인에이블
display.display();
상기 절차대로 하면 된다.
이번에는 샘플 프로그램을 좀 더 돌려보자
1. 샘플프로그램-1 = 상하이동
- startscrollright(0x00, 0x0F): scroll text from left to right
- startscrollleft(0x00, 0x0F): scroll text from right to left
- startscrolldiagright(0x00, 0x07): scroll text from left bottom corner to right upper corner
- startscrolldiagleft(0x00, 0x07): scroll text from right bottom corner to left upper corner
#include <Wire.h> #include <Adafruit_GFX.h> #include <Adafruit_SSD1306.h> #define SCREEN_WIDTH 128 // OLED display width, in pixels #define SCREEN_HEIGHT 64 // OLED display height, in pixels // Declaration for an SSD1306 display connected to I2C (SDA, SCL pins) Adafruit_SSD1306 display(SCREEN_WIDTH, SCREEN_HEIGHT, &Wire, -1); void setup() { Serial.begin(115200); if(!display.begin(SSD1306_SWITCHCAPVCC, 0x3C)) { // Address 0x3D for 128x64 Serial.println(F("SSD1306 allocation failed")); for(;;); } delay(2000); display.clearDisplay(); display.setTextSize(1); display.setTextColor(WHITE); display.setCursor(0, 0); // Display static text display.println("Scrolling Hello"); display.display(); delay(100); } void loop() { // Scroll in various directions, pausing in-between: display.startscrollright(0x00, 0x0F); delay(2000); display.stopscroll(); delay(1000); display.startscrollleft(0x00, 0x0F); delay(2000); display.stopscroll(); delay(1000); display.startscrolldiagright(0x00, 0x07); delay(2000); display.startscrolldiagleft(0x00, 0x07); delay(2000); display.stopscroll(); delay(1000); }
혹시몰라 파일을 첨부한다.
이번에는 FONT를 교체해보자
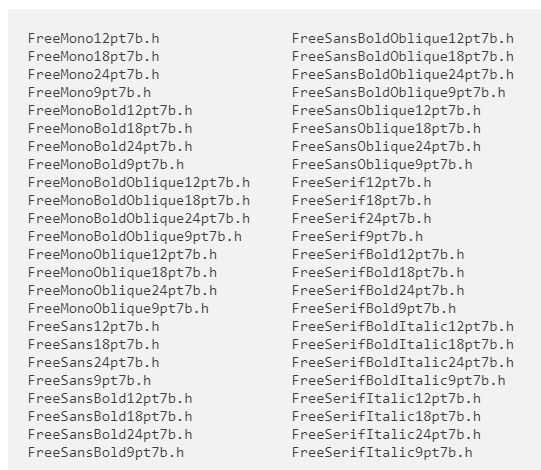
OLED 디스플레이에 더 잘 어울리는 글꼴은 9포인트와 12포인트 크기입니다
Font 프로그램 절차
1. 해당 라이브러리 해더파일 블러오기
#include <Fonts/FreeSerif12pt7b.h>
2. 글꼴지정
display.setFont(&FreeSerif12pt7b);
3. 원래 사용글꼴 호출시
display.setFont();
4. 실험 소스코드
#include <Wire.h> #include <Adafruit_GFX.h> #include <Adafruit_SSD1306.h> #include <Fonts/FreeSerif9pt7b.h> #define SCREEN_WIDTH 128 // OLED display width, in pixels #define SCREEN_HEIGHT 64 // OLED display height, in pixels // Declaration for an SSD1306 display connected to I2C (SDA, SCL pins) Adafruit_SSD1306 display(SCREEN_WIDTH, SCREEN_HEIGHT, &Wire, -1); void setup() { Serial.begin(115200); if(!display.begin(SSD1306_SWITCHCAPVCC, 0x3C)) { Serial.println("SSD1306 allocation failed"); for(;;); } delay(2000); display.setFont(&FreeSerif9pt7b); display.clearDisplay(); display.setTextSize(1); display.setTextColor(WHITE); display.setCursor(0,20); display.println("Hello, world!"); display.display(); delay(2000); } void loop() { }
5. 파일