출처: https://access.redhat.com/kb/docs/DOC-35379
http://jeongsam.net/38
VLAN의 개념
스위치의 모든 인터페이스는 동일 브로드캐스트 도메인에 포함되어 있으나 VLAN을 적용할 경우 스위치의 일부 인터페이스를 하나의 브로드캐스트 도메인으로 구성하고, 다른 인터페이스를 또다른 브로드캐스트 도메인으로 구성하여 여러 개의 브로드캐스트 도메인을 만들 수 있다. 이렇게 스위치에 의해 만들어진 브로드캐스트 도메인을 VLAN이라고 한다.
VLAN을 사용하는 일반적 이유
- 사용자를 물리적인 위치 대신 작업 그룹별로 묶는 유연한 설계를 제공한다.
- 더 작은 LAN(브로드캐스트 도메인)으로 분리해 VLAN의 각 호스트에서 일어나는 오버헤드를 줄인다.
- VLAN을 하나의 액세스 스위치로 제한함으로써 STP에 대한 작업 부담을 줄인다.
- 별도의 VLAN으로 나누어 중요한 데이터를 처리하는 호스트를 분리하여 보안을 강화한다.
- IP 전화기의 트래픽과 PC의 트래픽을 분리한다.
트렁킹
여러 대의 스위치가 서로 연결되어 있는 네트워크에서 VLAN을 사용할 때 스위치는 서로 VLAN 정보를 주고 받아야 하며, 스위치간 연결된 포트간 세크먼트를 VLAN 트렁킹(VLAN trunking)을 사용하여 해결한다. VLAN 트렁킹이 만들어지면 스위치는 VLAN 태깅(VLAN tagging)이라는 과정을 이용한다. VLAN 태깅 과정에서 스위치는 VLAN ID 필드를 이용하여 VLAN 정보를 교환한다.
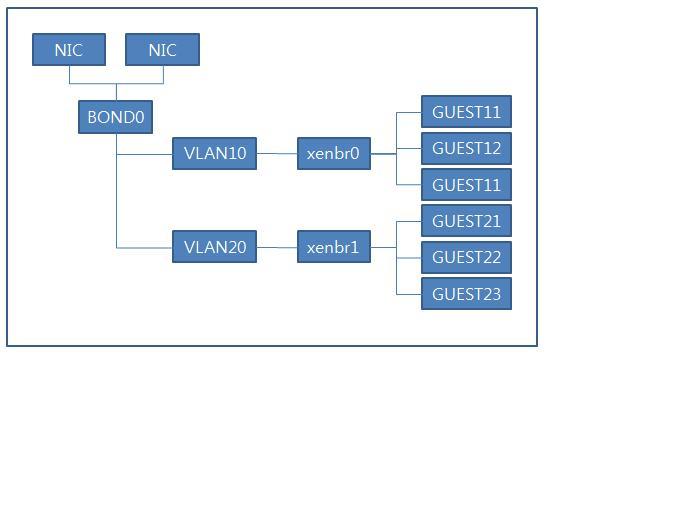
RHEL 가상화 환경의 VLAN을 포함한 기본 논리 구성도
다양한 기본 구성중에 일반적인 구성예이다.
VLAN을 이용하여 네트웍 트래픽을 줄이고, GUEST OS 네트웍 분리를 통해 보안을 강화할 수 있다.
bonding과 trunking으로 VLAN tagging 구성하기
Article ID: 35379 - Created on: Apr 13, 2010 10:28 AM - Last Modified: Jul 5, 2010 4:20 AM
이슈
trunking 과 802.3ad link aggregation 으로 802.1q VLAN tagging 을 설정하는 것은 하나의 작업 또는 다른 작업이 가능하나 동시에는 불가능 하다.
환경
- Red Hat Enterprise Linux 5
- Xen kernel
- Bonding
- 802.1q VLAN tagging
- 802.3ad link aggregation
Resolution
설정을 위해서는 아래와 같이 구성해라.
- 일반적인 method를 이용하여 bond interface를 구성해라. 802.3ad link aggregation 를 위해서는 mode=4를 이용해라 좀더 자세한 bonding에 대한 부분은 다음을 참고해라: How do I configure multiple bonding channels on my Red Hat Enterprise Linux system?
- bonding 된 interface위에서 원하는 형태로 VLAN interface를 구성하려면 아래와 같이 설정해라.
# vconfig add bond0 <vlan_id>
- Configure a bridge interface that your virtual hosts will connect to.
# brctl addbr <bridge_name>
- step 2부터 step3내에서 설정된 bridge로 VLAN interface을 추가해라.
# brctl addif <bridge_name> bond0.<vlan_id>
관련된 환경이 재부팅 이후에도 지속적으로 적용되기 위해서 관련된 환경파일을 수정해야한다..
예제 설정 정보는 아래에 나타나 있다. 예제에서 VLAN 10 이 사용되고 있다.
/etc/modprobe.conf 라인에 아래의 내용을 추가해라:
alias bond0 bonding mode=4
그외에 설정 파일들이 아래에 있다.:
/etc/sysconfig/network-scripts/ifcfg-eth0
BOOTPROTO=none
HWADDR=<Ethernet MAC address>
MASTER=bond0
SLAVE=yes
ONBOOT=yes
/etc/sysconfig/network-scripts/ifcfg-eth1
BOOTPROTO=none
HWADDR=<Ethernet MAC address>
MASTER=bond0
SLAVE=yes
ONBOOT=yes
/etc/sysconfig/network-scripts/ifcfg-bond0
BOOTPROTO=none
ONBOOT=yes
/etc/sysconfig/network-scripts/ifcfg-bond0.10
BOOTPROTO=none
BRIDGE=xenbr0
ONBOOT=yes
VLAN=yes
/etc/sysconfig/network-scripts/ifcfg-xenbr0
TYPE=Bridge
BOOTPROTO=none
IPADDR=<IP Address>
NETMASK=<Subnet Mask>
ONBOOT=yes
DELAY=0
NM_CONTROLLED=no
KVM은 bridge 이름에 어떤 제약도 없다. bridge 이름은 여기에서는 xenbr0이 사용되었다.
이것으로 XEN 또는 KVM 에서 작업되었는지를 확인하게 해준다.
XEN으로 설정하는 것은 /etc/xen/xend-config.sxp 파일내에 아래의 라인을 주석처리 해라.
(network-script network-bridge)
참고 : https://access.redhat.com/kb/docs/DOC-22959
https://access.redhat.com/kb/docs/DOC-16008
https://access.redhat.com/kb/docs/DOC-3511
simple example
Basic Network Layout with a VLAN tag on the NIC
In case VLAN tagging is required, the simple solution is to set up a tagged Eth interface on top of the physical NIC, and build a Logical Network bridge on top of the tagged Eth.

In order to set up a new Logical Network with a VLAN tag, when creating the Logical Network in the Data Center tab, check the "Enable VLAN Tagging" checkbox in the configuration window that is shown in Figure 3.24
Follow the Administration Guide through attaching the Logical Network to the Cluster (if required).
Then open the Hosts tab, select a host, open the Logical Networks subtab, edit an available NIC and change the "Network" parameter to the new Logical Network.
A new VLAN-tagged Eth.xxx instance will be created, and used with the new Logical Network.
Multiple VLAN Network Layout with a single NIC
In case the host should be communicating with several VLANs, it is possible to set up a few tags on a single physical NIC.

This is done by simply repeating the steps described above, in "Basic Network Layout with a VLAN tag on the NIC" with several tagged Logical Networks.
Every time an Eth interface is assigned a VLAN tagged Logical Network, a new Eth.xxx interface will be created and set up with its own Logical Network bridge.
When creating or configuring the virtual NICs on VMs, for every NIC there will be an option to choose to which bridge the NIC of a VM will be attached.